


- Choosing a selection results in a full page refresh.

Couldn't load pickup availability
Free Shipping
You may return most new, unopened items within 30 days of delivery for a full refund. We'll also pay the return shipping costs if the return is a result of our error (you received an incorrect or defective item, etc.).
You should expect to receive your refund within four weeks of giving your package to the return shipper, however, in many cases you will receive a refund more quickly. This time period includes the transit time for us to receive your return from the shipper (5 to 10 business days), the time it takes us to process your return once we receive it (3 to 5 business days), and the time it takes your bank to process our refund request (5 to 10 business days).
If you need to return an item, simply login to your account, view the order using the "Complete Orders" link under the My Account menu and click the Return Item(s) button. We'll notify you via e-mail of your refund once we've received and processed the returned item.
Lorem ipsum dolor sit amet, consectetur adipiscing elit, sed do eiusmod tempor incididunt ut labore et dolore magna aliqua. Ut enim ad minim veniam, quis nostrud exercitation ullamco laboris nisi ut aliquip ex ea commodo consequat. Duis aute irure dolor in reprehenderit in voluptate velit esse cillum dolore eu fugiat nulla pariatur. Excepteur sint occaecat cupidatat non proident, sunt in culpa qui officia deserunt mollit anim id est laborum.
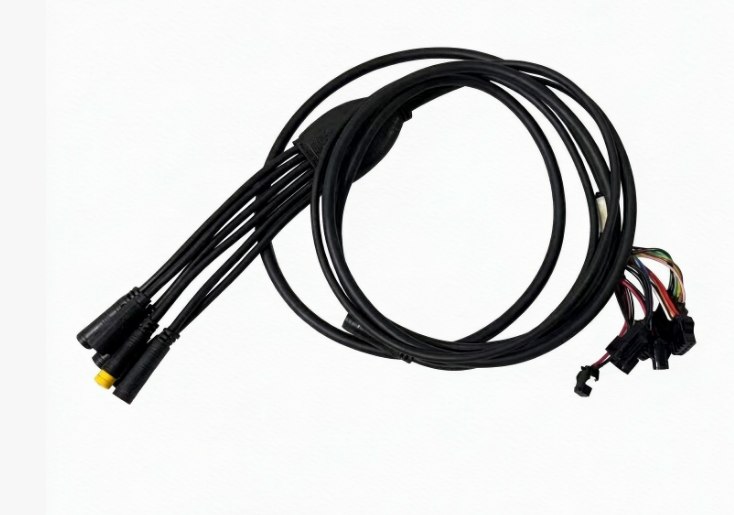
Replacement main wiring cable harness for the Arwibon Q30 electric scooter. This is the main cable running between the handlebar electrical components and the controller compartment inside the scooter deck.
The harness passes through the steering stem and connects the display, throttle, brake sensors, lighting system, control switches, and controller-side wiring.
Depending on the Q30 production version, the harness may include connections for:
Please compare the connector colors, pin numbers, cable branches, and plug configuration with your original Q30 wiring harness before ordering.
Different production batches of the Arwibon Q30 may use different wiring configurations. Do not select the cable only by scooter model name.
A complete main cable replacement requires access to both the handlebar wiring and the controller compartment. The cable must also be routed correctly through the steering stem and folding section.
Before disconnecting or installing the wiring harness:
If you are not familiar with electric scooter electrical systems, installation by a qualified technician is recommended.
Cut the cable ties below the handlebar carefully.
Keep the cutting tool away from the cable insulation, then separate the wiring branches so each connector can be identified.
Disconnect the waterproof plugs for the display, throttle, brake sensors, lights, and other handlebar controls.
Hold the connector housings and pull them apart in a straight line.
Do not pull directly on the wires.
Remove the black spiral protective sleeve around the lower steering stem and folding area.
Cut any retaining cable ties first, then unwind the sleeve from the wiring.
Remove the scooter deck cover to access the controller and internal wiring.
Disconnect the battery power before touching the controller connectors.
Remove the cable ties and protective wrap around the main harness entry point.
Locate the controller connectors belonging to the main wiring harness.
Press each locking tab before pulling the connector out.
The Q30 harness may use several multi-pin and auxiliary connectors. Record the original connector positions before removal.
Taking a clear photo before unplugging the wiring is recommended.
Locate the cable outlet and retaining block on the steering stem.
Remove the retaining screw with the correct Allen key and take off the cable retaining block.
Attach a nylon guide wire or pulling cord to the lower end of the old harness before extraction.
Pull the old harness gradually through the steering stem.
Keep the guide wire inside the stem after the old cable has been removed. It can then be used to install the replacement harness.
Before installation, compare the new cable with the removed harness.
Check:
Do not continue installation if the connector configuration is different from the original cable.
Arrange the controller-side connectors in a narrow staggered position so they can pass through the stem opening.
Attach them securely to the guide wire.
Feed the new harness into the steering stem while gently pulling the guide wire from the opposite end.
Do not force a connector through the opening if it becomes stuck.
Position the cable correctly inside the stem outlet and reinstall the cable retaining block.
The block should hold the outer cable sleeve securely without crushing the wiring inside.
Guide the lower section of the harness through the frame opening and into the controller compartment.
Leave enough cable inside the compartment for the connectors to reach their original positions without tension.
Avoid routing the cable against sharp metal edges or between the controller and deck cover.
Match each connector with its original controller socket.
Check the connector shape and locating tabs before pushing it into position.
The plug should seat fully and the locking tab should engage.
Never force a connector into a socket that does not match.
Locate the front light connector from the main harness.
Align the locating marks or internal guide and press the waterproof connector together completely.
Reconnect the display, throttle, brake sensors, lighting, and multifunction control wiring.
Match connectors according to their:
Push waterproof connectors together straight rather than twisting them.
Correct routing around the folding mechanism is important.
The hydraulic brake hose must not be trapped inside the folding hinge or suspension pivot area.
Route the brake hose smoothly around the suspension pivot with enough movement for steering and suspension travel.
The electrical harness should remain inside its protective spiral sleeve.
Leave enough cable movement for:
The cable must not become tight at full steering lock.
After all electrical connectors are installed, group the external cables neatly below the handlebar.
Wrap the wiring with the spiral protective sleeve and continue downward toward the stem and folding section.
Secure both ends with cable ties.
Do not tighten the ties enough to deform the cable insulation.
Before reinstalling the deck completely, carry out the following checks.
Turn the handlebar fully left and fully right.
Check that no wiring becomes tight, pinched, or pulled at the connectors.
Fold and unfold the steering stem.
Watch the wiring around the folding hinge and confirm that neither the main harness nor the brake hose is trapped.
Reconnect the battery after all plugs have been checked.
Turn the scooter on and confirm:
Raise the drive wheel off the ground during the first motor test.
After the electrical test passes:
We have a 30-day return policy, which means you have 30 days after receiving your item to request a return.
To be eligible for a return, your item must be in the same condition that you received it, unworn or unused, with tags, and in its original packaging. You’ll also need the receipt or proof of purchase. To start a return, you can contact us at support@arwibonscooter.com
If the return is caused by the consumer, consumer should be responsible for the shipping fee. The specific fee should be based on the express company you choose.
If due to our reasons, the goods received are damaged or not correct, and the consumer is not required to bear the shipping fee for this reason
If your return is accepted, we’ll send you a return shipping label, as well as instructions on how and where to send your package. Items sent back to us without first requesting a return will not be accepted. You can always contact us for any return question at support@arwibonscooter.com.
Please inspect your order upon reception and contact us immediately if the item is defective, damaged or if you receive the wrong item, so that we can evaluate the issue and make it right.
Certain types of items cannot be returned, like perishable goods (such as food, flowers, or plants), custom products (such as special orders or personalized items), and personal care goods (such as beauty products). We also do not accept returns for hazardous materials, flammable liquids, or gases. Please get in touch if you have questions or concerns about your specific item. Unfortunately, we cannot accept returns on sale items or gift cards.
The fastest way to ensure you get what you want is to return the item you have, and once the return is accepted, make a separate purchase for the new item.
European Union 14 day cooling off period,Notwithstanding the above, if the merchandise is being shipped into the European Union, you have the right to cancel or return your order within 14 days, for any reason and without a justification. As above, your item must be in the same condition that you received it, unworn or unused, with tags, and in its original packaging. You’ll also need the receipt or proof of purchase.
We will notify you once we’ve received and inspected your return, and let you know if the refund was approved or not. If approved, you’ll be automatically refunded on your original payment method within 10 business days. Please remember it can take some time for your bank or credit card company to process and post the refund too.
If more than 15 business days have passed since we’ve approved your return, please contact us at support@arwibonscooter.com.
We proudly offer free US shipping via the following methods! Please note that it takes us an average of 3 to 5 business days to complete your order before we can ship it. Rest assured that we are doing everything we can to get your order to you as quickly as possible! Once your order is shipped, the estimated delivery time is 7 to 10 business days, depending on your country or region. Please consider that any holidays, natural disasters, or epidemics may affect delivery time
We have a US warehouse, and it usually takes 7-10 days to ship from a local warehouse in the United States
We have a warehouse in Poland, Europe. The shipping costs of various European countries are inconsistent and need to be determined according to the specific country. It usually takes 7-10 days to ship from a European warehouse
We ship available items immediately. Pre-ordered/back-ordered items ship when ready. If you receive part of your order first, don't worry; the rest is on its way.
Receive a confirmation email/text with tracking ID. Visit our Tracking Page to monitor your package's journey. Allow 1-3 days for tracking updates.
Buyers are responsible for correct shipping addresses. Contact us immediately if you notice an error.
You cover return shipping costs. Refer to our Refund Policy for details on returns.
We aren't liable for lost/stolen packages. Contact your carrier if your tracking shows delivery but you haven't received it. For assistance, email support@arwibonscooter.com
Thanks for subscribing!
This email has been registered!

| Product | SKU | Description | Collection | Availability | Product Type | Other Details |
|---|